

Now, if you really want to get into car photography I recommend you mow the lawn with a fork first and then decide if you still want to, because that activity operates on the same levels of annoyment and nitpicking, but there are a few tips to get that professional fizz into your pictures without too much effort...
1. Get a decent camera, tripod and objective.
There is no way around this. You need a DSLR. There's no worse thing than an unsharp picture of a smokin' hot car. If you're even remotely serious about shooting cars, considerable amounts of money should go into this investment, but remember, you can't eat a camera so don't waste your life savings on it. It's just not worth it. However, I'd recommend going for a semi-pro Canon EOS at once, because you don't want to outgrow your camera after a few months of practice. When you immerse into the business you'll find that there is no upper limit to how much money can be burnt on hording lenses and objectives, but starting out will cost you at least the price of a decent DSLR and objective. A tripod isn't a must, but it dramatically improves the sharpness of your pictures.
 |
| Surgical sharpness. Don't think they achieved that with bare hands... |
2. Forget your dignity and get dirty.
Photographing a car is a physical exercise in many ways. Cleaning is a big part of the job. Yes, really. You have to make sure the setting is clean and garbage-free because details like an empty soda can or an old plastic bag in the peripherals are huge attention drawers. A quick clean-up before starting the shoot is a good routine and pays off in the quality of the pictures.
 |
| High angle. Yummy. |
 |
| Don't like the ground clearance, but thank God the attention is drawn elsewhere... |
3. Setting matters.
You think you can just go out in your driveway and take great pictures of your car? No. The scenery is a big deal when shooting a car, so you really want to take your time to look for a suitable and coherent setting, weather it'd be an abandoned warehouse, a curvy mountain road or a stretch of open tarmac between two fields.
 |
| Epic scenery, my personal wallpaper-favorite. By TopGear of course. |
There are generally two options when choosing a background. You either pick a background that contrasts the car or a background that complements it. For example, if you're going for a moody feel, a black-on-black background can work wonders, whereas a black-on-white background will contrast the car and make it stand out, which is the point of car photography in the first place, but works for a different purpose.
 |
| Great example of contrast |
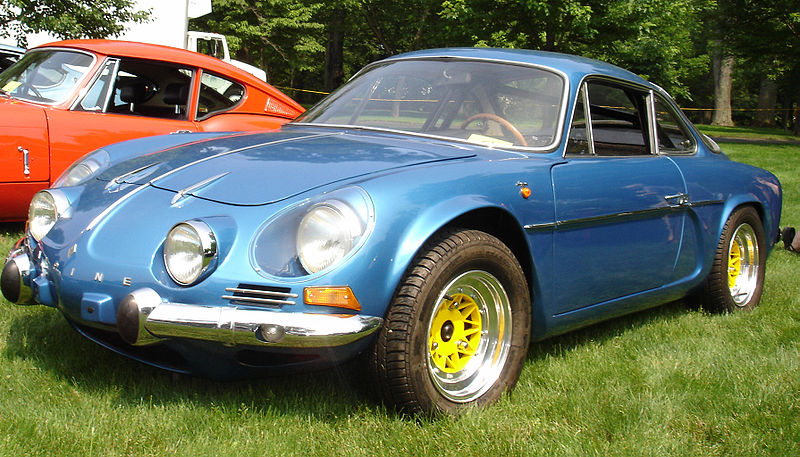
The trick is to have an immaculate setting but not have it draw the attention from the car. This is achieved by having a "clean" background. Details such as power lines, road signs, other cars in the distance, garbage on the ground etc. will draw attention from the car and slap the picture back to snapshot-quality. Keeping the silhouette of the car intact is also crucial, so if you notice any lamp posts, trees or other random objects "sticking out" of the silhouette you'll need to address those issues in PhotoShop. Also, a big mistake people often make is they park the car somewhere unnatural (on a lawn or a field etc.[see picture of Alpine A110 below]) and think they've come up with a setting. The problem here is that the car usually looks out of place, so play it safe and don't take the car too far from its natural habitat.
 |
| Picture raped by reality. |
4. Prepare yourself with a piece of cloth and some car cleaning chemicals.
Yes, more cleaning, reality is a bitch. Most cars you'll come across will not be in photogenic condition when you see them. Consequentially, to get them in picture-worthy condition all dust and dirt needs to be cleaned off. Imperfections on the car will show very effectively in a sharp photo, and a good picture is easily ruined by the car being dirty. Pay extra attention to the rims, because they are a huge attention drawer in a car and thus need to be extra carefully cleaned. Keep in mind that the entire cleaning process may take up as much as 3-4 hours depending on how meticulous and professional you want to be. Also worth mentioning is that any clutter inside the car may also shine through in the picture (a parking disc on the dashboard for example), so do the cleaning inside and out. And last but not least, stickers on the windscreen. Get rid of them. Immediately. 100% of the time they'll make the car look hideous in a picture.
5. Don't put the car in the middle of the shot.
Surprise surprise, the rule of thirds applies to car photography too. Don't put the main objective (i.e the car) in the middle of the frame. Try placing it a bit to the left or to the right or wherever, just not in the middle, unless you're looking for an intentional effect of some sort. You'll notice that your pictures will start looking so much better the minute you off-center the main objective a bit. You don't have to rigorously follow the rule of thirds, but as long as you remember NOT to put the car bang in the middle your fine. Experimenting is the key to success here, so go nuts with the camera and goof around a bit. You'll get the feel for what works and what doesn't.
 |
| Perfect example of a shitty pic. Car is dead centered, barely fits the frame, looks out of place,there's some eye-saw on the dashboard, the silhouette is ruined by the other car and the van rapes the background |
6. Don't use the flash. Ever.
Flash photography is an incredibly hard thing to get right unless you know exactly what you are doing, so don't use it for now. You'll just end up ruining the shot.
7. Black and white is a real pain in the arse.
In the beginning try staying away from these colors because they tend to screw up the white balance of the picture. Usually these colors will lead to underexposed or respectively overexposed pictures, and the trick is to manually under/overexpose the picture accordingly, but it takes a lot of practice and mistakes. New DSLR's can actually cope with this problem rather well by calculating an average balance, but this requires a balanced background in the picture.
 |
| Underexposure. The problem with photographing something black. |
8. The magic is in the three/quarter angle.
Dig out a random car magazine and look at the front page. Chances are it'll show a three/quarter shot of a car of any given make. This is because a classic three/quarter angle simply works.You can pick up the car's side lines while exploring the front end and get an overall feel of the stance. The rims are exposed, you can grasp the depth of the design etc. It simply is the perfect all-around angle. Use it liberally.
 |
| Nothing special. Just three/quarters. |
9. Wake up in time for sunrise
The golden hour for outdoor photography is the hour after sunrise and the hour before sunset. That's when the natural light is at its best or softest or whatever, meaning you don't have to work up too much computer magic to make the pictures look good. Avoid shooting the car at noon, because the broad daylight and intense sun will overexpose the pictures and pretty much ruin them. A good thing to remember is to work with the light, not against it. A car can be moved around quite easily in comparison to the sun, so don't run around the car for those different angles, but move the car around instead, otherwise you'll end up with nasty shadows and reflections that might make the car look like excrement.
 |
| Notice that shadow? The overexposure is nicely handled though. |
10. Take your time
People tend to think photographing a car works a lot like taking a picture of an attraction. You snap a couple of shots and "BAM!", you're done in two minutes, but that's not how it works. I usually reserve a 2 hour minimum for a single-location photoshoot, and that's already stretching the limits. It takes surprising amounts of time moving the car around, finding the angles, experimenting with different light-settings and getting a good variety of pictures, so don't be afraid to take your time.
 |
Now, it's perfectly fine to start practicing with your Mondeo, but if there's any possibility for you to score your friend's lovingly kept Porsche I'd say invest in buying him a couple of drinks and ask him nicely to lend the car for a couple of hours. In the end it's much more inspiring to discover the delicate design lines and angles of something a bit more exotic than to just settle for the mundanity of a daily driver, not that you can't have great shots of those too. Oh, one more thing. Learn to use PhotoShop. You'll need it.
-HS
I actually like the ground clearance in the Lambo shot - just because for a car shot, it's something not all would do! Usually those who think a little out of the box end up making more interesting photos (= pictures that stand out from the crowd in a world full of a looot of talented automotive photographers) :)
ReplyDeletePluuus that car looks amazing from any angle ;)
You're absolutely right, originality is the key to rising beyond average. I actually like that lambo shot too, in spite the ground clearance. I actually liked it so much so, that I just had to find a reason to incorporate it into this post and ground clearance was it :D BTW You'd have to be very talented to make that lambo look bad in a shot.. hehe
DeleteOH, plussaa suomalaisuudesta :D
This is awesome post which increase my knowledge with such a car trapped tips information.
ReplyDeleteTaking lots of photos with my car is just like a passion to me. I'm having lots of photos with my car, almost filled my album but yet has not got the best one. All the time I think a random pic will look more natural but the fact is, it truly need some professional help to capture the best one. The camera quality is good, the car is also at a good condition to take photos with it. The second point is little difficult to follow. Flash is really something that should be avoided. It needs a perfect lighting and flash is not that. Thanks for your cool tips on photography. Land Rover Service Le Grange IL.
ReplyDeleteProfessional car photography can be extremely fun and testing simultaneously. For certain individuals, autos are a type of craftsmanship and their style of configuration makes them extremely engaging.
ReplyDeleteExcellent tips for car photography, If anyone follows these tips I think these tips will be really helpful for photography. Thanks for sharing this with us.
ReplyDeleteGreat topics for car or automotive ,,,,thanks for sharing with us.
ReplyDeleteCar image editing
Car image editing
Car photo editing
Automotive photo editing
Vehicles background replacement
Excellent post . I have read this blog and enjoyed a lot .
ReplyDeletee-commerce-image-editing
This is Amazing Blog post .I read your blog .It is very usfuly blog..
ReplyDeleteClipping Path Life
Thanks for sharing these cool tips. You may share couple of car images editing tips on photoshop.
ReplyDeleteFantastic tips! Understanding lighting and angles can truly transform car photography. The emphasis on location and the use of reflections for that extra flair are game-changers. A concise yet comprehensive guide for enthusiasts and professionals alike. Well done!
ReplyDelete